If you follow me on Twitter @xxByte you must have seen the tweets about scaning a large scope of IPs and how did I approach that.
The goal: To scan all TCP ports (0-65536) of ~800 IPs spread across Europe and detect any low hanging fruits using automated tools or manual assessment in the most efficient way with the least resources needed.
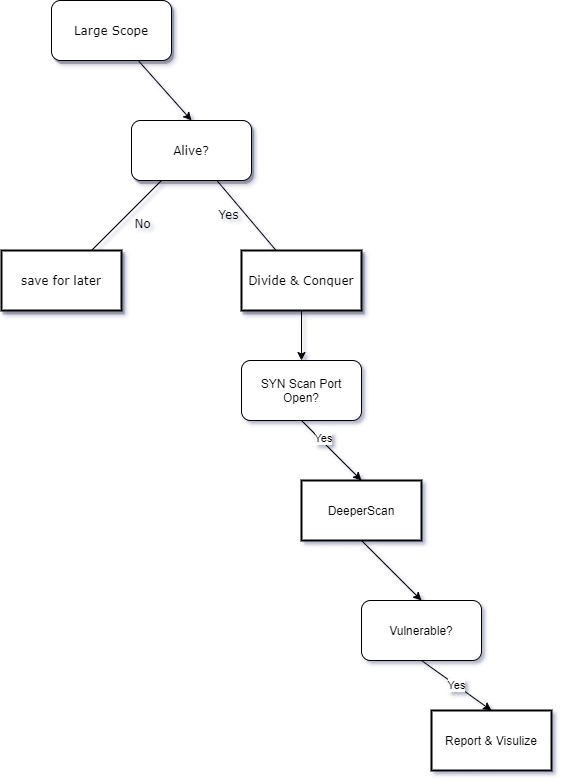
The approach:
Let’s first do some math. Scanning 65536 TCP ports on 800 IPs means:
65536 x 800 = 52428800. That’s 52428800 SYN packet out and waiting for a SYN ACK reply packets in total.
To have the rest of the project requirements we need to scan each open port with deeper script scan and version detection scan, which means even more packets.
At such scale we cannot afford to script scan blindly all TCP ports. So what I did is “divide and conquer”, which I’m going to detail here.
1- Cut the fats, detect only alive IPs
At this step you have 800 IPs and you want to have the alive ones only. You can do that with nmap easily with the -sn flag
-sn (No port scan)
This option tells Nmap not to do a port scan after host discovery, and only print out the available hosts that responded to the host discovery probes. This is often known as a “ping scan”, but you can also request that traceroute and NSE host scripts be run. This is by default one step more intrusive than the list scan, and can often be used for the same purposes. It allows light reconnaissance of a target network without attracting much attention. Knowing how many hosts are up is more valuable to attackers than the list provided by list scan of every single IP and host name.
The default host discovery done with -sn consists of an ICMP echo request, TCP SYN to port 443, TCP ACK to port 80, and an ICMP timestamp request by default. When executed by an unprivileged user, only SYN packets are sent (using a connect call) to ports 80 and 443 on the target. When a privileged user tries to scan targets on a local ethernet network, ARP requests are used unless –send-ip was specified. The -sn option can be combined with any of the discovery probe types (the -P* options, excluding -Pn) for greater flexibility. If any of those probe type and port number options are used, the default probes are overridden. When strict firewalls are in place between the source host running Nmap and the target network, using those advanced techniques is recommended. Otherwise hosts could be missed when the firewall drops probes or their responses.
|
1 |
nmap -sn -iL large-scope.txt -oA alive |
Note that I left reverse DNS on (default) so I can see where my IPs are located based on their domain names. In my case I had a lot of .de domains which indicated a lot of the IP addresses will be located in Germany. Take note of this as we will use it later to further improve our scan efficiency.
After getting hosts that are up, we filter our results to get a clean IPs list only using cut command:
|
1 |
cat alive.gnmap | cut -d " " -f2 | tee alive-cleaned.txt |
the file alive-cleaned.txt now contains a list of IPs that are 100% alive and scannable. Next step is to devid this list further to and get it ready to be scanned.
2- Divide and Conquer the list
Once we have a clean list of IPs we want to preferable have a smaller lists of 100 to 150 IPs. You can of course keep everything in one list, but I prefered this appraoach so I can make sure if I have any error or network problem it does not snow-balls into the rest of the scanning.
I did this quickly using awk
|
1 2 3 |
awk 'NR==1, NR==150' alive-cleaned.txt | tee 1st-batch.txt awk 'NR==151, NR==300' alive-cleaned.txt | tee 2nd-batch.txt awk 'NR==301, NR==450' alive-cleaned.txt | tee 3rd-batch.txt |
3- Time for that super sneaky fast SYN Scan
Remember we are scanning all TCP ports, this is very slow. To make things efficient we will tweak nmap and use a 1gbps network throughput cloud instance. I used digital ocean and made sure I deploy it in Germany (remember in step 1 where I took note of the IPs geo location?)
Once I fired up the cloud instance and had latest version of nmap running I created a directory for each batch and fired up nmap scans like this:
|
1 2 3 |
nmap -n -Pn -sS -p- -T4 --max-rtt-timeout 300ms --stats-every 15m --open -oA ~/1/results -iL ~/1/1st-batch.txt` && \ nmap -n -Pn -sS -p- -T4 --max-rtt-timeout 300ms --stats-every 15m --open -oA ~/2/results -iL ~/2/2nd-batch.txt` && \ nmap -n -Pn -sS -p- -T4 --max-rtt-timeout 300ms --stats-every 15m --open -oA ~/3/results -iL ~/3/3rd-batch.txt` |
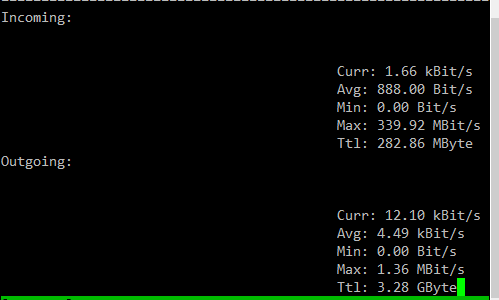
In the same time, I made sure to be accountable for the network traffic so I had nload running in the background.
After some days nmap will finish scanning all the scope with a lightweight fast SYN scan. It took me around 24hrs for each 100IPs so expect almost 5 days for this scan to finish on 500 IPs.
4- Let’s go deeper
After having all results from all SYN scans. It’s time to catch those low hanging fruits. I like to use nmap script engine none intrusive flag for these. You can adjust your scan accordingly.
Unfortunately there was no way to feed-in previous nmap SYN scan results into nmap again to have it do a vulnerability scan on the open ports. So I had to write my own script.
The script can be found here: https://github.com/AddaxSoft/deepScanner
along with its usage example.
I gathered all .xml results from all the previous scan and merged them into one .xml file using this tool: https://github.com/CBHue/nMap_Merger
5- Visualize results and process further
Now you have the end results of script vulnerabilities scan. The resulted XML files can be once again merged into one end-results file and fed into a visualizing tool such as:
– https://github.com/SabyasachiRana/WebMap
– https://doc.ivre.rocks/en/latest/usage/use-cases.html#your-own-shodan-zoomeye-censys-binaryedgeio-whatever
6- Support!
If you liked my blog, make sure you follow me on twitter @xxByte

Leave a reply